
Introduction
Spring is a season that breathes life into everything it touches. As the flowers bloom and the sun shines brighter, we find ourselves inspired by vibrant colors and the promise of new beginnings. This is the perfect time to express your creativity and embrace the joyous spirit of the season. One delightful way to do this is through nail art, which allows you to showcase your personality and flair. In this article, you’ll learn how to craft your own stunning French nail art inspired by the beauty of spring. From the basics of French nail art to advanced techniques and design ideas, we’ll guide you through every step of the process.
“Creating a cozy reading nook is all about maximizing comfort in a small space. It’s about intentional design that serves both function and feeling.”
– Interior Design Magazine
Understanding French Nail Art: The Basics
French nail art, often simply referred to as a French manicure, is a classic style that features a natural-looking base with white tips. The appeal of this design lies in its chic simplicity and versatility, making it a timeless favorite among nail enthusiasts. Originally popularized in the 1970s, this style has evolved significantly. Initially created to provide a polished look for natural nails, it has transformed into a canvas for creativity, allowing for various interpretations and color combinations.
Historically, the French manicure was designed to give the illusion of longer, healthier nails. Over the years, however, it has adapted to incorporate bold colors, intricate designs, and unique patterns. Today, modern French nail art can include everything from pastel hues to glittery finishes, reflecting personal style and seasonal trends.
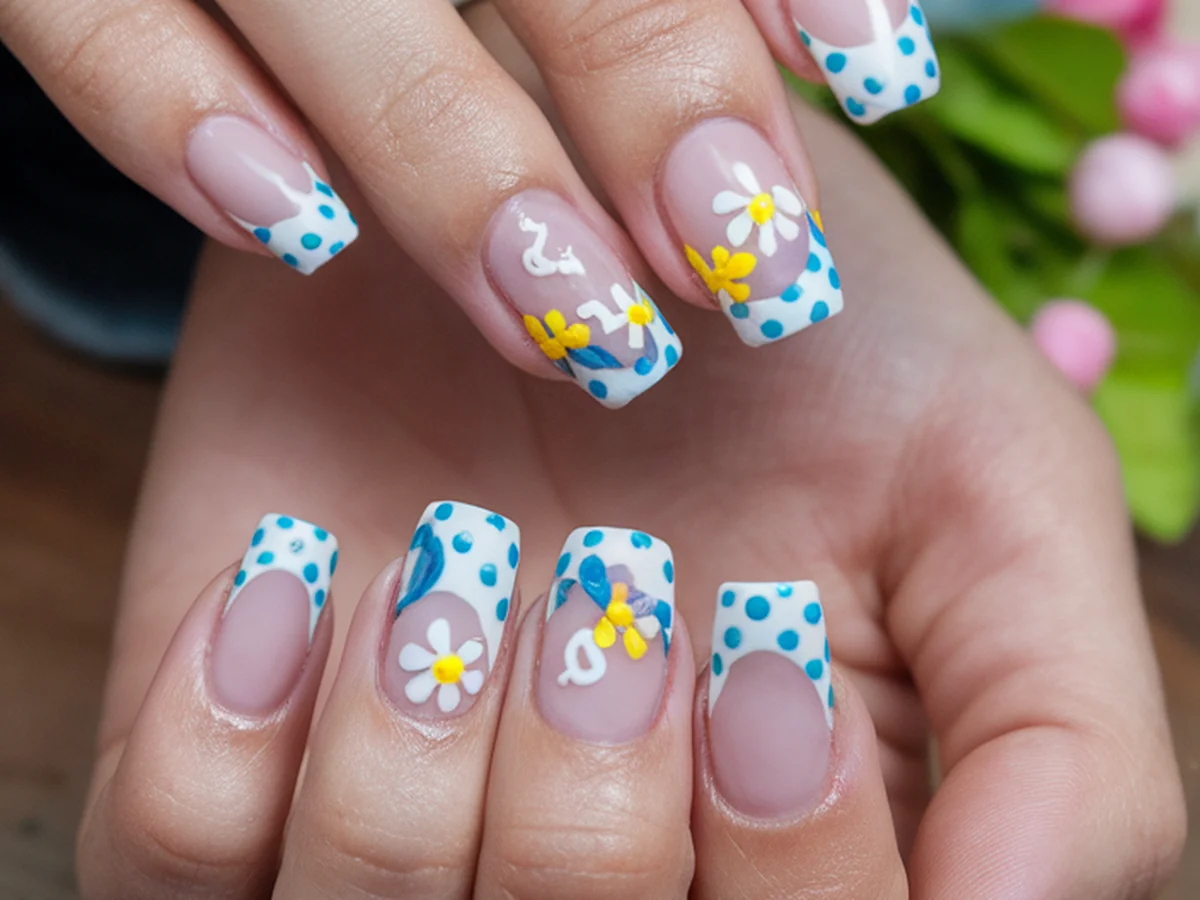
The primary difference between traditional and modern French nail art lies in the creativity applied to the tips. While traditional French tips are typically white, contemporary designs can feature a rainbow of colors, patterns, and embellishments. This shift has opened the door for endless possibilities, especially during spring when floral motifs and pastel shades abound.
Essential Tools and Materials for DIY French Nail Art
Creating your own French nail art requires a few essential tools and materials that will help you achieve salon-quality results at home. Here’s a list of what you’ll need:
| Tool/Material | Purpose | Suggested Brands |
|---|---|---|
| Nail Clippers | To trim and shape nails | Revlon, Tweezerman |
| Nail Files | To smooth edges | OPI, Essie |
| Cuticle Pushers | To push back cuticles for a clean look | Sephora, Sally Hansen |
| Nail Polish | For base and tip colors | OPI, Essie, China Glaze |
| Nail Tape | To create clean lines for designs | Born Pretty, L.A. Colors |
| Dotting Tools & Brushes | For intricate designs and patterns | Amazon Basics, KADS |
Choosing the right nail polish colors is crucial, especially for spring. Pastel shades like soft pinks, mint greens, and baby blues are perfect for a fresh look. Bright colors such as coral, lavender, and sunny yellow can also add a fun pop to your nails. Additionally, consider investing in some specialty polishes like glitter or metallic finishes to add a unique twist to your designs.
Preparing Your Nails for Art
Before diving into the world of nail art, it’s essential to prepare your nails properly. Nail care is a crucial step that ensures your designs not only look fantastic but also last longer. Start by cleaning your nails thoroughly with a gentle nail polish remover to eliminate any residue. Next, trim and file your nails to your desired shape, whether that’s square, oval, or stiletto. A smooth surface is key to achieving a polished look.
Once your nails are shaped, buff the surface lightly to create a smooth canvas. This step helps the polish adhere better and prevents chipping. After buffing, apply a quality base coat to protect your nails and enhance the longevity of your art. The base coat creates a barrier between your nails and the polish, minimizing potential damage.
Additionally, don’t forget to care for your cuticles. Moisturize them regularly with cuticle oil to keep them healthy and hydrated. Healthy cuticles not only improve the overall appearance of your nails but also allow for easier application of nail polish, preventing damage during the painting process.
Creating the Classic French Tip
Now that your nails are prepped and ready, it’s time to create the classic French tip. Follow these simple steps to achieve the perfect look:
1. Apply a Base Color: Choose a sheer or nude polish as your base color. Apply one or two coats, allowing each layer to dry completely.
2. Prepare for the Tips: Once your base is dry, it’s time to create the tips. You can use nail tape or guides to mark off the areas where you want to paint the tips. This will help you achieve a clean edge.
3. Paint the Tips: Dip your brush into the white polish and apply it to the tip of your nail, following the natural curve. Start from one side and sweep across to the other, maintaining a consistent width.
4. Remove the Tape: Carefully peel off the tape or guides while the polish is still wet to ensure clean lines.
5. Finish with a Top Coat: Once the white polish has dried, seal your design with a clear top coat to add shine and provide extra durability.
While creating your French tips, be aware of common mistakes. Uneven lines and thick paint can detract from the overall look. Take your time, and don’t rush the process. If you do make a mistake, simply use a small brush dipped in nail polish remover to clean up any imperfections.
Spring-Inspired Design Ideas for French Nail Art
Now that you’ve mastered the classic French tip, it’s time to get creative with spring-inspired designs! Here are some fun ideas to elevate your nail art:
– Floral Patterns: Incorporate delicate flowers into your design. Use a dotting tool to create tiny blossoms at the base of your nails or along the tips. Colors like light pink and lavender are perfect for a soft, spring feel.
– Geometric Shapes: Add a modern twist by incorporating geometric shapes. Create triangles or lines along the tips or base of your nails using nail tape. This can give your French manicure a contemporary vibe that stands out.
– Seasonal Colors: Experiment with color combinations that reflect spring. Pair a pastel yellow base with bright coral tips, or use a mint green base with white tips adorned with small dots or stripes.
These ideas are not only visually appealing but also allow you to express your individuality. Feel free to mix and match different designs or colors to create a look that is uniquely yours!
Advanced Techniques for Unique Nail Art
If you’re ready to take your nail art to the next level, consider trying some advanced techniques that can add depth and creativity to your designs.
– Ombre Effects: Create a stunning gradient look by blending two or more colors. Start with a base coat and then use a makeup sponge to dab the colors onto your nails, blending them together for a beautiful ombre effect. This technique works wonderfully with shades like pink and purple for a fresh spring look.
– Glitter and Metallic Accents: Don’t shy away from sparkle! Adding glitter or metallic accents can transform a simple French manicure into something spectacular. Consider using a glitter polish on the tips or adding a metallic stripe along the edge for a chic finish.
– Nail Stamping: If you’re looking for intricate patterns without the hassle of freehand painting, nail stamping is a great option. Invest in a nail stamping kit, which includes plates with various designs. Simply apply polish to the plate, scrape off the excess, and transfer the design onto your nails.
These techniques can elevate your nail art and make it truly unique. Experimenting with different styles can also help you discover your preferences and skills.
Caring for Your Nail Art
Once you’ve created your stunning nail art, it’s crucial to take steps to maintain its beauty. Here are some tips for caring for your designs:
– Avoid Harsh Chemicals: Protect your nails from harsh chemicals found in cleaning products. Wearing gloves while doing household chores can help prolong the life of your nail art.
– Use a Top Coat: Regularly applying a clear top coat can help seal your designs and prevent chipping. Consider reapplying every few days to keep your nails looking fresh.
– Nail Polish Remover: When it’s time to remove your nail art, opt for an acetone-free remover to minimize damage. Soak a cotton ball in the remover, press it against your nail, and let it sit for a few moments before gently wiping away the polish.
By following these tips, you can enjoy your beautifully crafted nail art for longer, ensuring that your hard work pays off.
Showcasing Your Nail Art
Now that you’ve perfected your French nail art, it’s time to show it off! Social media is a fantastic platform for sharing your creations. Take well-lit photos of your nails from different angles to capture the details of your designs. Consider using natural light for the best effect.
Engaging with online communities can also enhance your nail art journey. Join nail art groups on platforms like Instagram or Pinterest to connect with fellow enthusiasts. Participate in nail art challenges to inspire and be inspired by others.
Sharing your unique designs not only allows you to showcase your creativity but also encourages others to try their hand at DIY nail art. You never know who you might inspire!
Conclusion
Creating personalized French nail art is a joyful and fulfilling endeavor that allows you to express your creativity as spring unfolds. From mastering the classic French tip to exploring advanced techniques and unique designs, there’s no limit to what you can create. Embrace the colors and patterns of the season, and don’t hesitate to experiment with your style. Remember, the most beautiful nail art comes from the heart. So grab your tools, let your creativity flourish, and share your masterpieces with the world!
Frequently Asked Questions
What is the best way to remove nail polish without damaging my nails?
To remove nail polish safely, use an acetone-free nail polish remover. Soak a cotton ball with the remover and press it against your nail for a few seconds before gently wiping the polish away. This method minimizes damage and keeps your nails healthy.
How long does a French manicure typically last?
A well-done French manicure can last from one to three weeks, depending on your nail growth and daily activities. Regularly applying a top coat can help extend the life of your manicure and keep it looking fresh.
Can I create French nail art on short nails?
Absolutely! French nail art can be adapted to suit any nail length. Short nails can look chic with a classic French tip or even with creative designs that incorporate patterns or colors without overwhelming the nail.
What are some tips for perfecting my nail art skills?
Practice is key to improving your nail art skills. Start with simple designs and gradually work your way up to more complex techniques. Watching tutorial videos online can also provide helpful tips and inspiration.
Are there any special products I should use for nail health?
Yes! Consider using cuticle oil and strengthening base coats to promote nail health. Regular moisturizing of your cuticles can prevent dryness and damage, while strengthening products can help keep your nails robust and less prone to breakage.